
Blog
Publish and manage blog posts with a built-in rich text editor, categories, tags, and author profiles.
Every site includes a built-in Blog system. Blox handles post writing, rich-text formatting, categories, tags, author bio cards, and automatically generates live /blog routes and an RSS feed for you.
Overview
The Blog Dashboard is a headless content management system (CMS) built directly into your website management interface. It allows you to write long-form articles in a rich-text editor, organize your posts with categories and tags, attribute them to custom author profiles, and customize SEO parameters per post.
The Blog Dashboard Tabs
In your site's management page, select the Blog tab in the left sidebar. The interface is organized into four tabs:
1. Posts Tab
This is your primary blog dashboard, showing a list of all your articles.
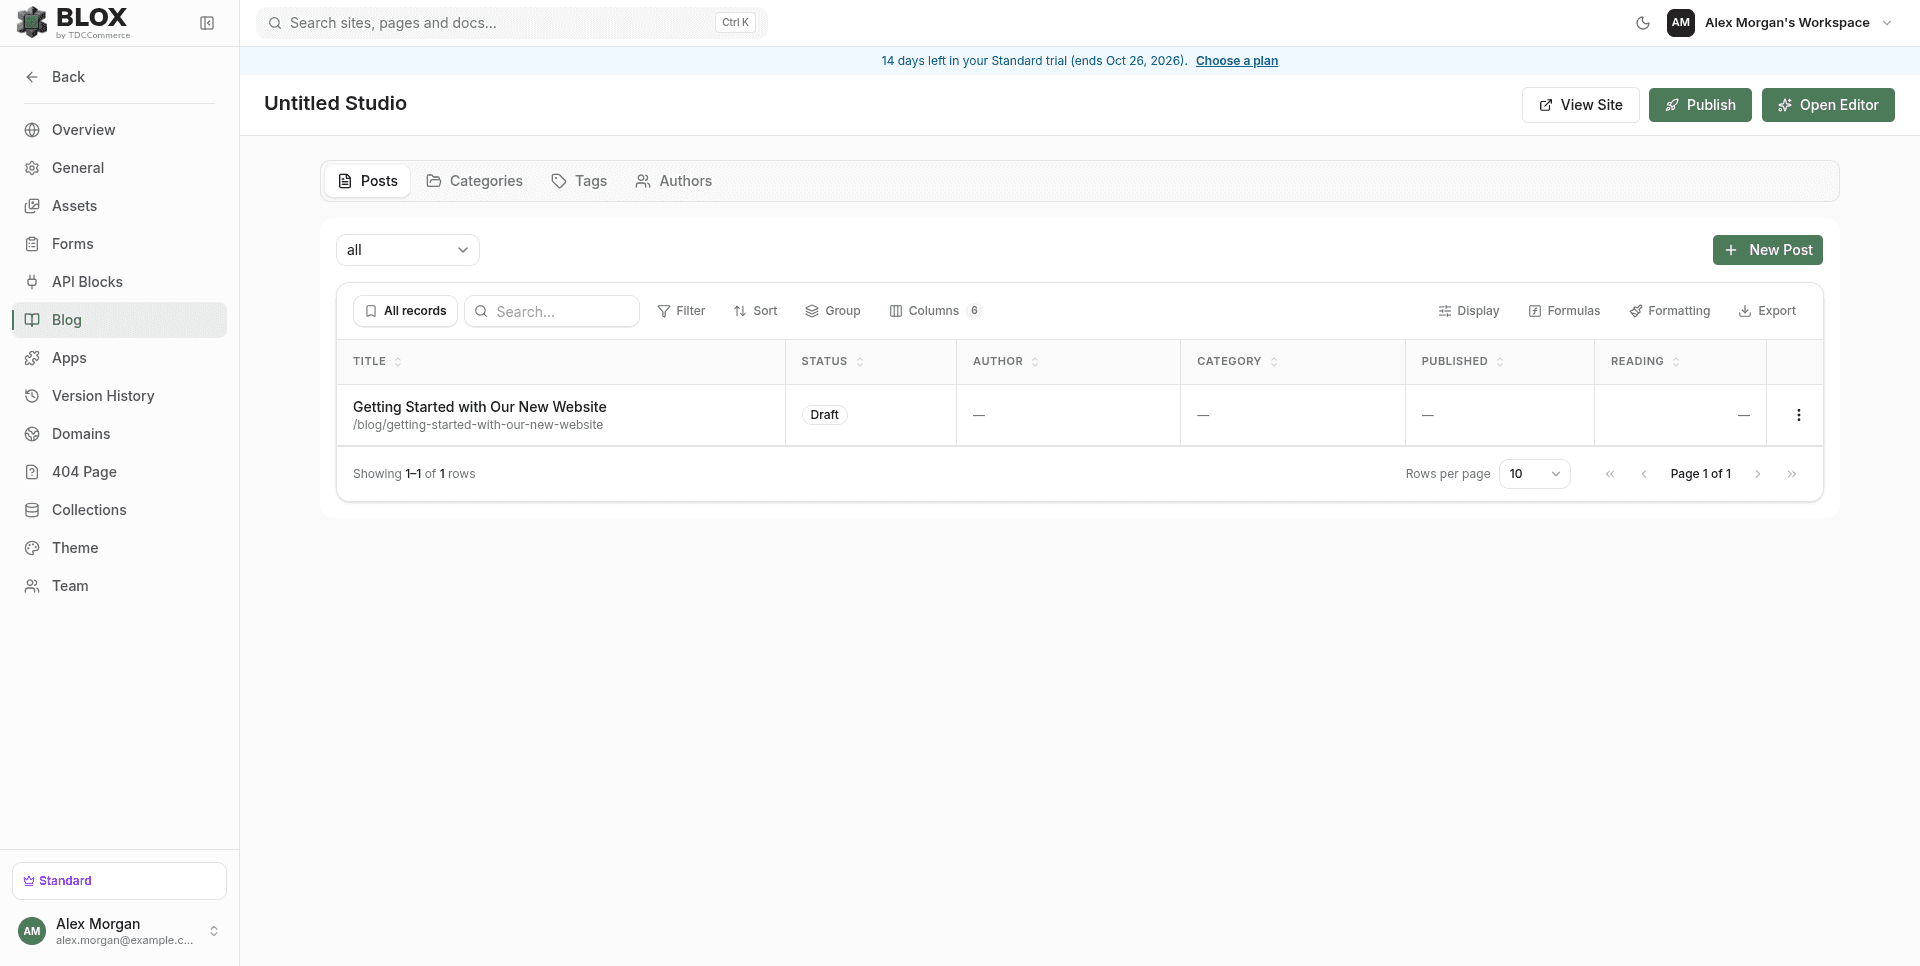
- Search: Matches against a post's title, slug, and excerpt.
- Status Filter: Filter list entries by status — All statuses, Draft, Published, or Archived.
- Posts Table: Displays Title (with the
/blog/{slug}path underneath), Status badge, Author, Category, Published date, and Reading time. - Actions Menu (⋮): Quick options — Edit content, Publish/Unpublish, Duplicate, and Delete post.
The Archived status exists in the filter and as a status badge style, but there's currently no action in the dashboard that archives a post — filtering by Archived will always show an empty list.
Deleting a post is permanent. It removes the post, all of its saved draft/published versions, and any featured sections that reference it — this cannot be undone.
2. Categories Tab
Categories represent the primary high-level topics for your blog. Each post belongs to at most one category.
- Click New Category to set a Name, an optional Slug (auto-generated if left blank), and an optional Description.
- Use the pencil and trash icons to edit or delete a category. When a category is deleted, its posts keep their content but become uncategorized — no posts are removed.
3. Tags Tab
Tags are cross-cutting labels that describe specific subjects. A post can have multiple tags.
- Click New Tag to set a Name and an optional Slug.
- Tags are shown as a list of pills, each displaying the tag name and a count of how many posts currently use it. Deleting a tag removes it from any posts that reference it.
4. Authors Tab
Create bio profiles for writers, independent of your dashboard team collaborators.
- Click New Author to create an author card.
- Author Fields: Display name, Slug (auto-generated if left blank), Bio, Email, and social links — Twitter, LinkedIn, and Website.
- Linking an author to a post automatically displays their name, bio, and social links on the public article page. Deleting an author leaves their posts in place but unattributed.
Creating a Blog Post
To start a new blog post:
In the Blog → Posts tab, click the New Post button in the top-right corner.
In the dialog, enter the Title. The Slug field is optional — leave it blank and a URL-safe slug is generated for you from the title when the draft is created, or enter your own custom path.
Click Create draft. You are immediately redirected to the Rich Text Blog Editor.
Using the Rich Text Blog Editor
The Blog Editor features a rich text canvas with a side settings panel for classification, cover image, and display options.
Writing Content
Above the body, an optional Excerpt field lets you write a short summary shown on the /blog index page (and matched by search) — if left blank, the public index falls back to an auto-generated preview.
The body editor supports:
- Markdown shortcuts: type common markers like
##for a heading,-at the start of a line for a bullet list,1.for a numbered list, or>for a blockquote, and they convert into formatted blocks automatically. - Rich formatting toolbar: headings, bold/italic/underline/strikethrough, inline code, sub/superscript, text color and highlight, alignment, bullet/numbered/task lists, blockquotes, code blocks, tables, and links.
- Media: insert an image from your site's Asset Picker or from a direct URL, embed a YouTube video, or insert a raw HTML/Liquid block for advanced markup.
- A word and character counter is shown at the bottom of the editor.
Raw HTML/Liquid blocks are HTML-escaped by everything else in the editor by default — use this block only when you specifically need to embed markup the rest of the editor can't produce.
Settings Panel (Right Sidebar)
Use the panel on the right to configure classification and display options:
| Card | Fields |
|---|---|
| Author & classification | Author (defaults to Unattributed), Category (defaults to Uncategorized), and Tags — click a tag badge to toggle it on or off. |
| Cover image | Pick or replace a cover image using the Asset Picker. |
| Display | Five toggles controlling what's visible on the public post page: Cover image, Author byline, Published date, Reading time, and Tags. |
Once a post has been published at least once, a View live post link appears in this panel, pointing to its public /blog/{slug} page.
SEO & Custom Metadata
At the bottom of the editor, the SEO & metadata card lets you optimize search visibility and social graphics for the article:
- Meta Title & Description: Override the search engine title and preview snippet. Both fall back to the post's title and excerpt when left blank.
- OG Image URL: Specify a custom Open Graph image for preview cards on social networks (Facebook, Twitter, Slack, etc.). Falls back to the cover image when left blank.
- Canonical URL: Enter a canonical link if this post is cross-posted from another website.
- Exclude from search engines (noindex): Toggle to prevent web crawlers from indexing this post.
There's no character limit enforced on Meta Title or Meta Description — write to whatever length reads best in search results, keeping in mind that most search engines will still truncate very long titles or descriptions in their results display.
Publishing Workflow
Blox uses a precise publishing lifecycle to prevent accidental edits from going live:
- Save: Persists your changes. Disabled whenever there's nothing new to save.
- Snapshot draft: Saves the current state as a numbered draft version (saving first if you have unsaved changes) without changing the post's live status — useful for keeping a checkpoint while you keep editing.
- Publish: Saves your changes, sets the post's status to
Published(recording the publish date on first publish), and makes it instantly accessible on the public/blog/{slug}route and the/blogindex feed. - Unpublish: Only shown once a post is published. Reverts the post's status back to
Draftand immediately removes it from the live site.
Publishing or unpublishing a post fires a blog.post.published-family webhook event, if you have any subscribed. See Webhooks and Event Types for the full catalog.
Public Routes
Blox automatically serves your blog pages and feeds dynamically:
- Blog Index: Served at
/blog(displays the list of published posts, excerpt snippets, read times, and cover images). - Post Pages: Served at
/blog/[slug]. - RSS Feed: Generated automatically at
/blog/rss.xml. Whenever you publish, update, or unpublish posts, the RSS feed is regenerated to notify subscribers and feed readers.