
Forms
Collect visitor data with no-code forms — configurable fields, spam protection, email notifications, and sync to Mailchimp, HubSpot, and Zendesk.
Every site can have one or more custom forms. Blox handles form rendering, validation, spam protection (honeypot + reCAPTCHA), and stores every submission for you.
Overview
The Forms Dashboard and Form Builder allow you to build complex visitor contact forms, event registrations, or surveys without writing a single line of code. All submissions are saved to a central inbox, where you can search, filter, and export them as a CSV file.
Creating a Form
To create a new form for your website:
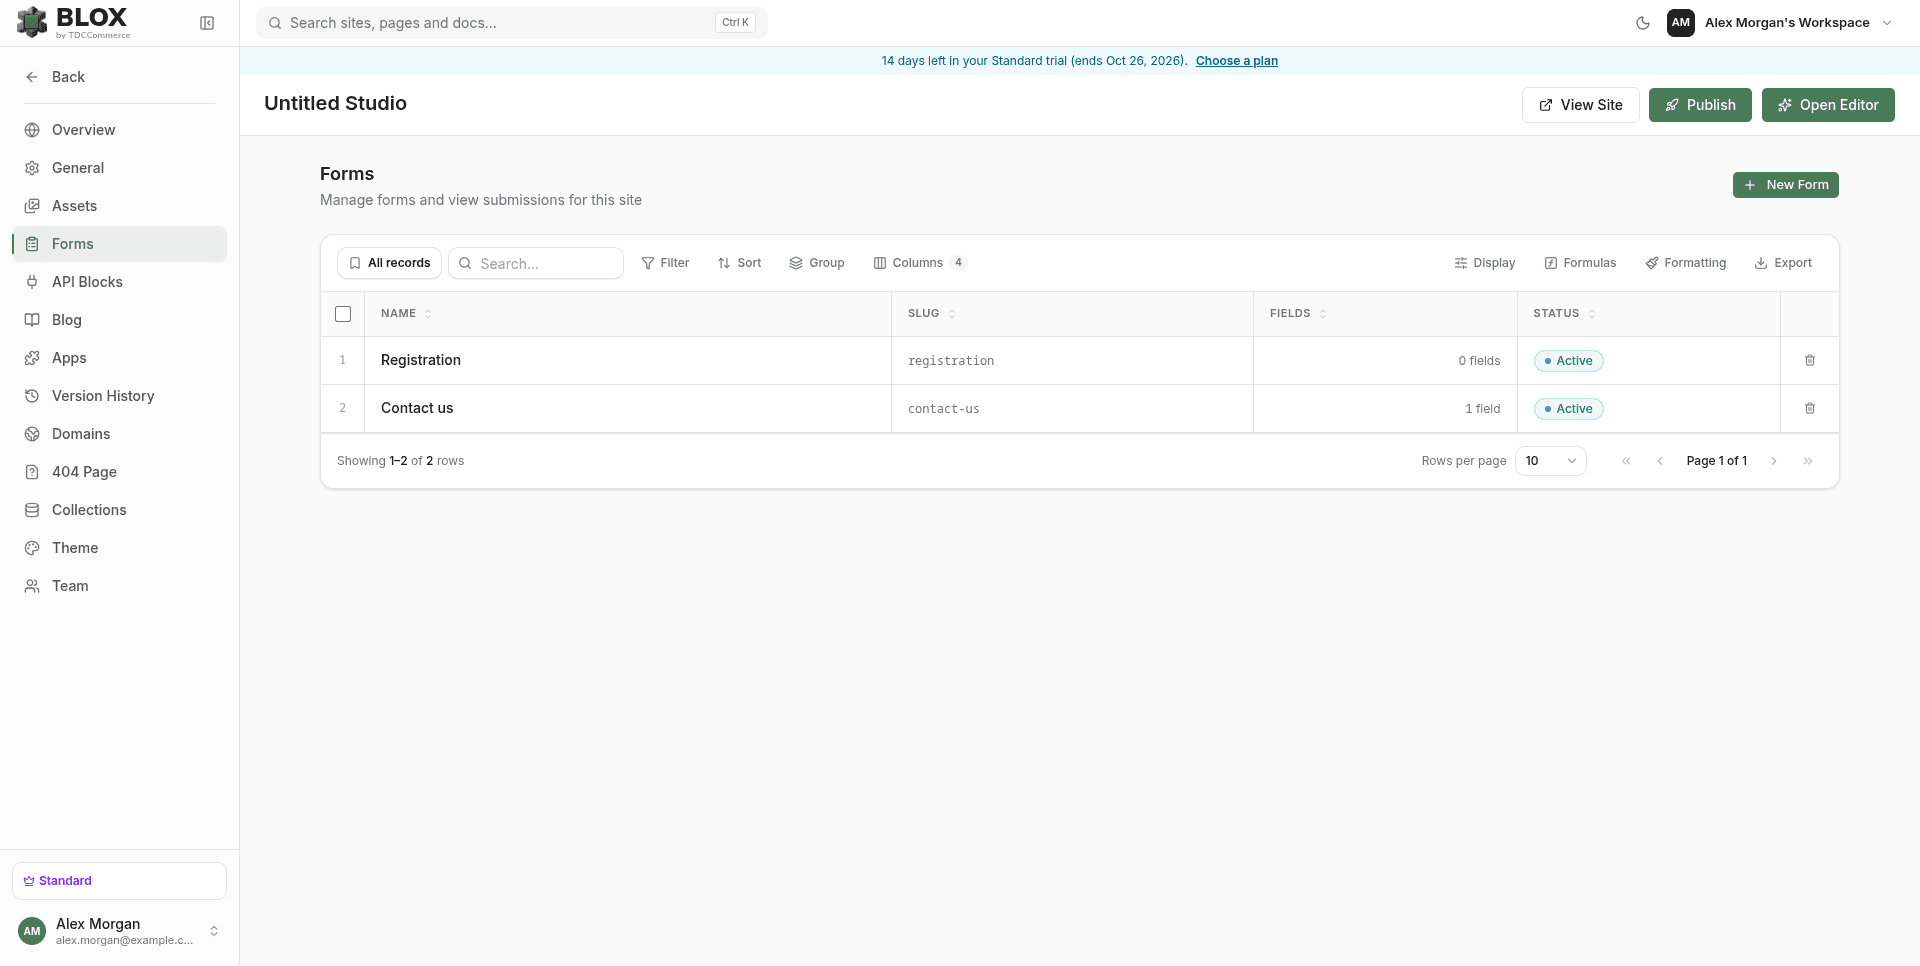
Navigate to your Site Management dashboard and select the Forms tab in the left sidebar.
Click the New Form button in the top-right corner.
In the dialog that appears, give your form a name (e.g., Contact Us or Newsletter Sign-up) and click Create Form.
Once created, the form appears in your Forms list showing:
- Name: The display name of your form.
- Slug: The unique URL-safe identifier for the form's API endpoint (e.g.
/contact_us). - Fields: The number of input fields configured.
- Status: Whether the form is currently active and accepting submissions, shown as an Active / Inactive badge.
Click the Manage button (or the three-dot menu ⋮ and choose Manage) to navigate to the Form Detail page.
Adding a Newsletter block to a page from the visual editor automatically provisions a shared form named Newsletter Signup (slug newsletter-signup) with a single required Email field — no manual setup needed. It appears in this list like any other form, so you can still manage its fields, review submissions, or adjust its settings here.
Searching & Pagination
Use the Search by name or slug... box above the table to filter the list as you type (results update automatically). The page-size selector at the bottom lets you display 5, 10, 20, 50, or 100 forms per page (default 10).
Deleting a Form
To permanently remove a form, open the three-dot menu ⋮ next to it and choose Delete.
Deleting a form is irreversible and also permanently deletes all of its submissions. Make sure you've exported any submission data you need (see Exporting as CSV) before confirming.
The Form Detail Page & Navigation
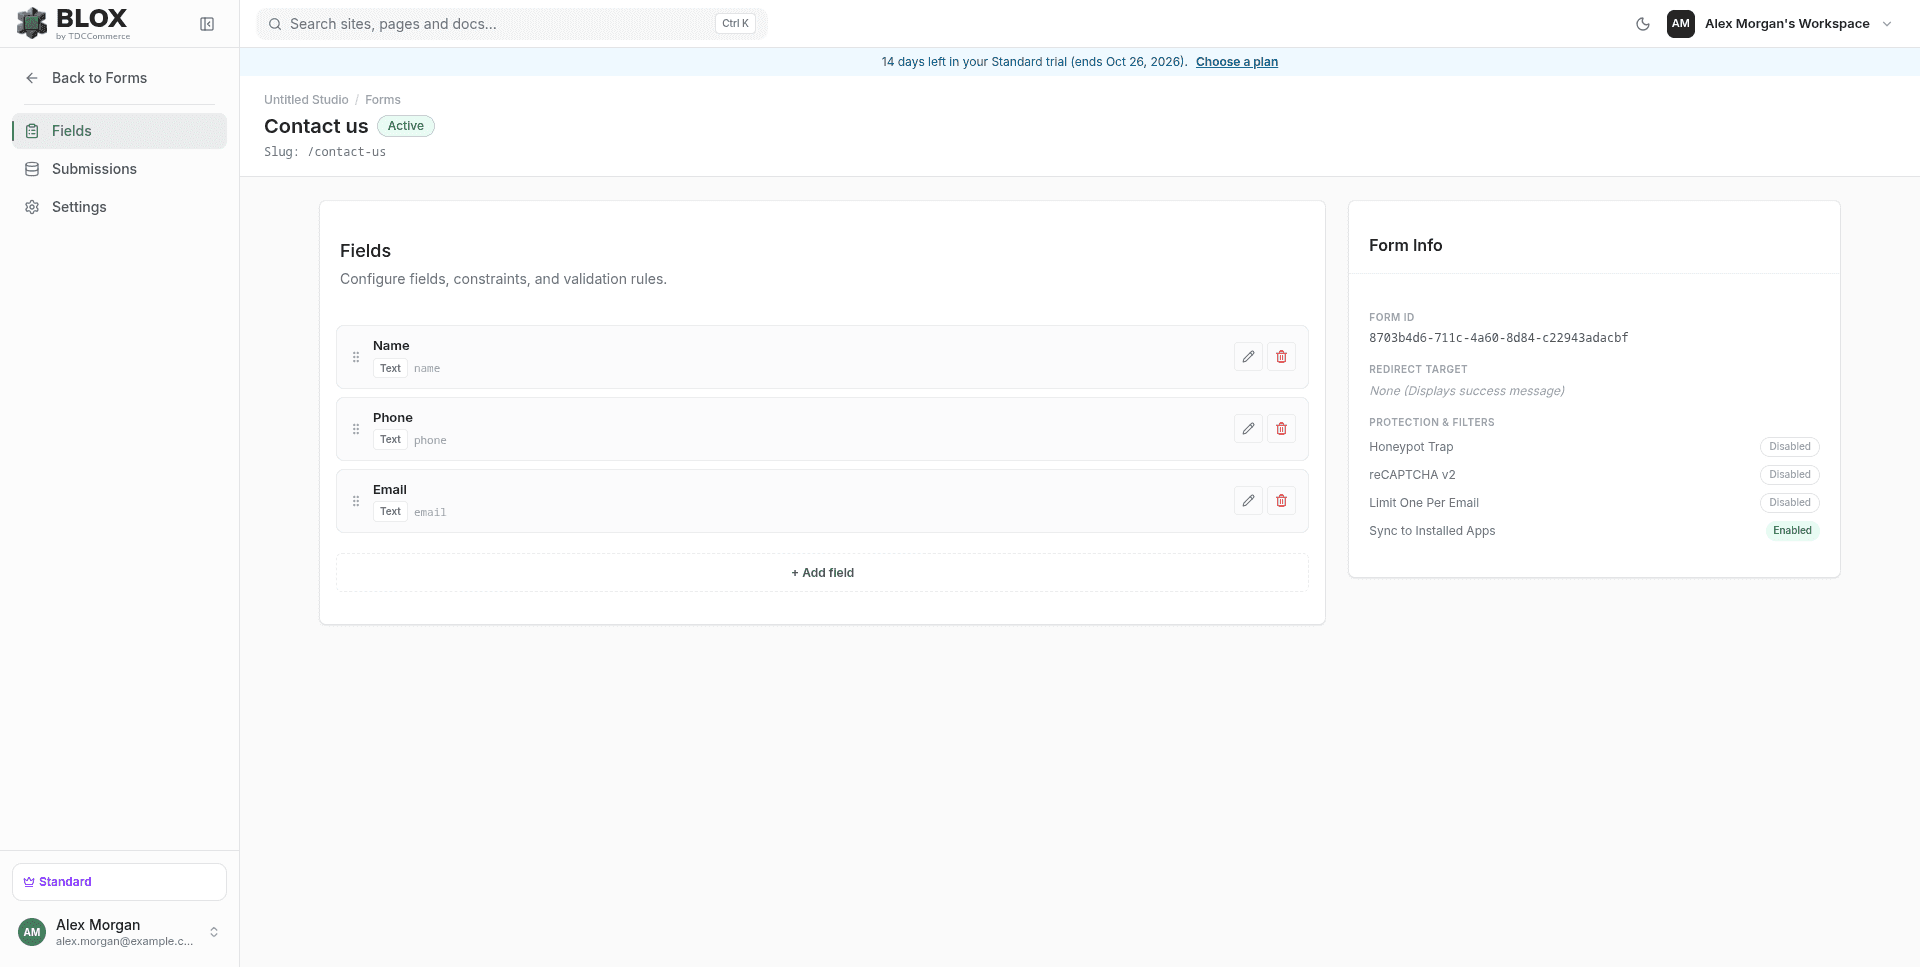
Clicking Manage redirects you to a dedicated management interface for that specific form. At the top of the interface, you can view the parent site name and the current form name, alongside its active status badge and slug.
The left-hand navigation allows you to switch between three core tabs: Fields, Submissions, and Settings. A ← Back to Forms button above the tabs returns you to the site's Forms list at any time.
Form Info Panel
Alongside the active tab, a Form Info card gives you at-a-glance metadata for the form:
- Form ID: The form's unique database identifier — click it to select and copy.
- Redirect Target: Shows the configured Redirect URL as a clickable link, or None (Displays success message) if none is set.
- Protection & Filters: A live, read-only summary of the form's current Settings-tab configuration, rendered as Enabled / Disabled badges:
| Badge | Reflects |
|---|---|
| Honeypot Trap | The Honeypot Trap toggle on the Settings tab. |
| reCAPTCHA v2 | The Google reCAPTCHA v2 toggle on the Settings tab. |
| Limit One Per Email | The Limit One Per Email toggle on the Settings tab. |
| Sync to Installed Apps | The app-sync toggle described in Integrations & Notifications below. Enabled by default. |
The Form Info panel is read-only — switch to the Settings tab to change any of these values.
1. Fields Tab
The Fields tab is where you structure your form layout by adding, configuring, or reordering inputs.
Supported Input Types
Blox supports a wide range of input types to gather structured data:
| Type | Best Used For |
|---|---|
| Text | Single-line text fields (e.g., First Name, Company Name). |
| Email addresses (performs automatic format validation). | |
| Phone | Telephone numbers. |
| Number | Numeric values (performs format validation and enforces min/max values). |
| Textarea | Multi-line text boxes (e.g., Message, Feedback). |
| Dropdown | Select-list dropdown where users pick one option. |
| Multiselect | Select-list dropdown where users can pick multiple options with removable tags. |
| Radio | Option lists where users pick one choice. |
| Checkbox | Single toggles (e.g., "Accept Terms") or multiple selections. |
| Date | Date selection widget. |
| File upload | Letting visitors attach files. |
| Hidden | Stashing tracking codes or context values invisible to the user. |
Field Configuration Settings
Each field can be customized with these properties:
| Property | Description |
|---|---|
| Label | The text displayed next to or above the input field on the page. |
| Field Name (Key) | The unique JSON property key for this field (e.g., full_name). It is automatically slugified from the Label, but you can customize it. |
| Type | The kind of input field (e.g., Text, Email, Number, Dropdown, Multiselect). Changing this updates the rendered input style and validation rules. |
| Required | When enabled, the form cannot be submitted without a valid value in this field. |
| Width | Choose between Full Width (takes up the entire line) or Half Width (enables compact side-by-side elements). |
| Placeholder | Default light grey text shown inside the input before the visitor types. |
| Default Value | Pre-fills the field with a default value. |
| Options | For Dropdown, Multiselect, and Radio fields, add custom label-value pairs for choices. |
Validation Rules
For advanced fields, you can configure granular validation rules:
- Min Length: The minimum number of characters required.
- Max Length: The maximum number of characters allowed.
- Regex Pattern: A standard regular expression pattern (e.g.,
^[A-Z]+$) to enforce strict formats.
- Min Value: The lowest number allowed.
- Max Value: The highest number allowed.
- Min Length: The minimum digit count.
- Max Length: The maximum digit count.
Reordering Fields
To reorder fields, click the up (▲) and down (▼) arrow buttons on the left of any field row. The order changes instantly and is synchronized with the form layout.
Editing & Deleting Fields
To modify or delete a field, use the action buttons on the rightmost side of the field row:
- Edit: Opens the field configuration editor inline where you can adjust properties or validation rules. Click Save field to apply changes.
- Del: Permanently removes the field from the form layout.
2. Submissions Tab
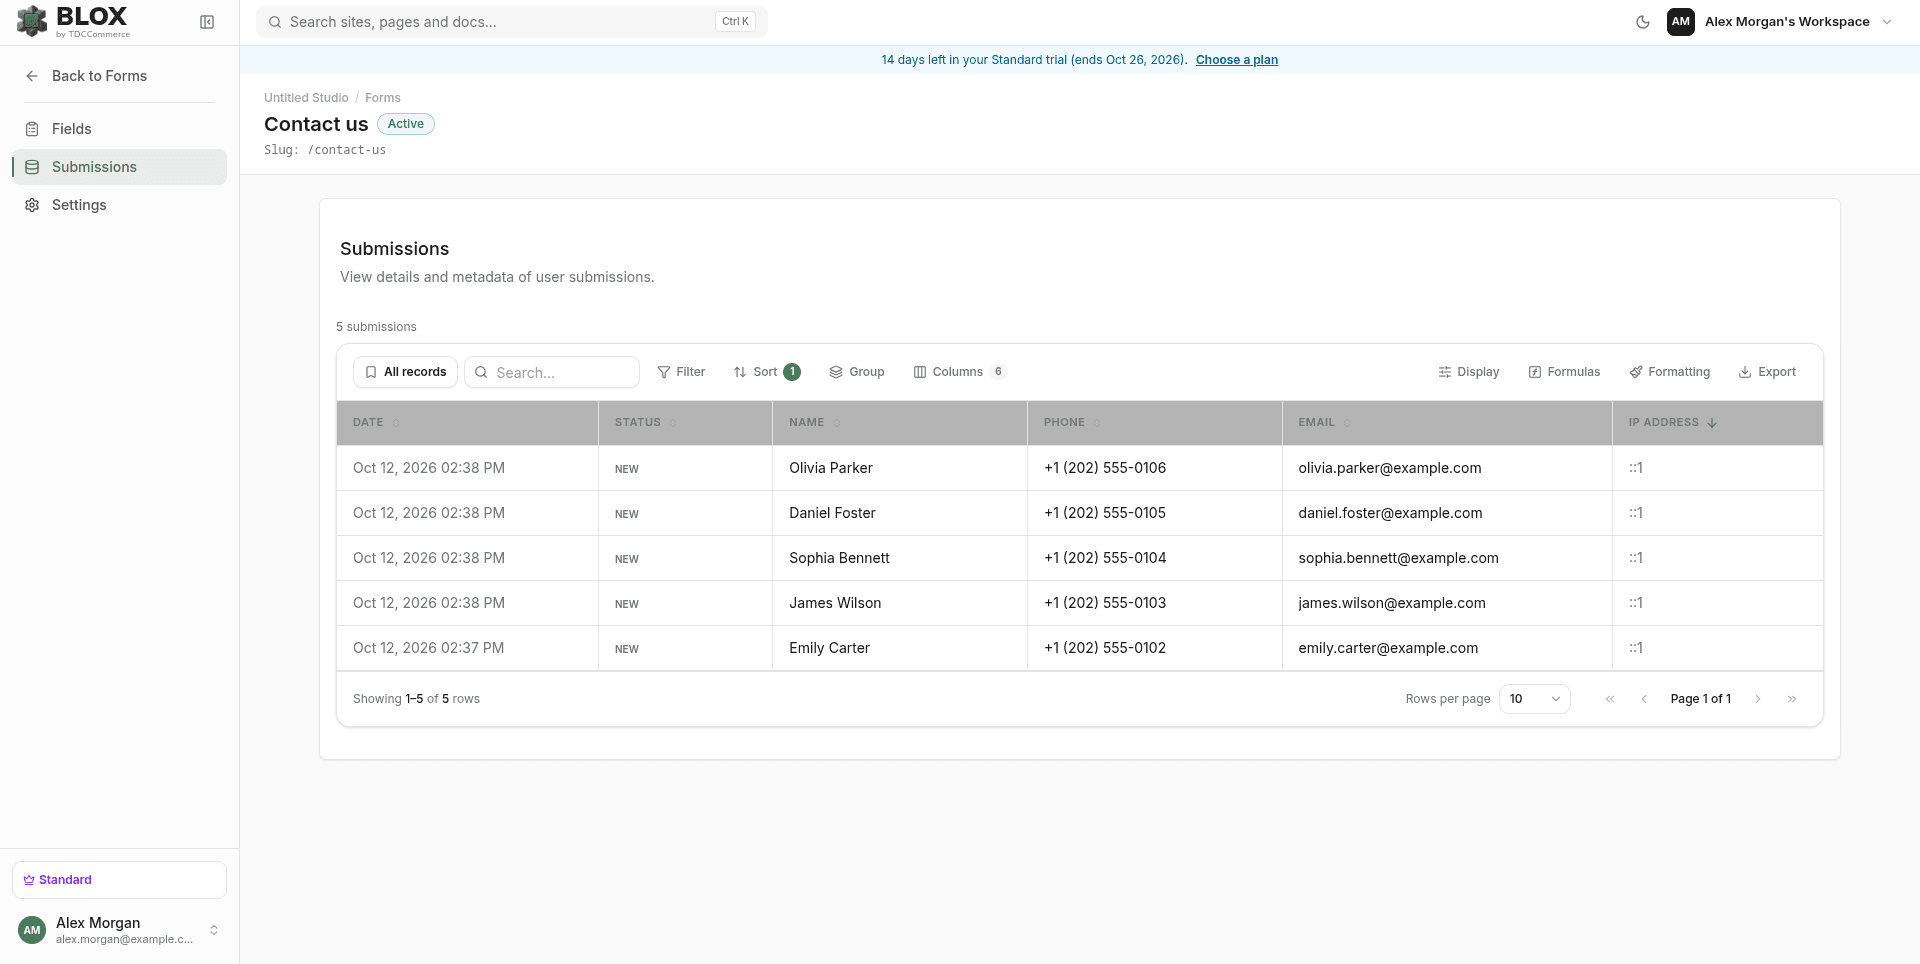
The Submissions tab displays all entries sent by visitors in real-time.
Viewing Entries
Each entry is displayed as a row containing:
- Date/Time: The date the form was submitted, formatted to your local timezone.
- Status: The submission status (e.g.,
NEW,read, orspam). - Field Data: Every custom field value submitted by the user. The table columns scale dynamically to show each field defined in your Fields tab.
- IP Address: The client IP address of the submitter.
Exporting as CSV
Click the Export CSV button to download a spreadsheet-friendly CSV of all form submissions. The CSV includes additional metadata:
- Exact date and time (ISO format)
- Status
- All custom field columns
- IP Address
- User Agent (Browser details)
- Referrer URL (The page the submission originated from)
Export always fetches every submission across all pages, not just the ones currently visible — you don't need to change the page size before exporting.
3. Settings Tab
The Settings tab lets you control the behavior of your form after a visitor submits it, as well as customize spam protection, integrations, notifications, and status.
Changes on this tab only take effect once you click Save settings at the bottom. This is independent of the Fields tab, where each field saves immediately via its own Save field button.
Identity
You can update your form's unique identifiers under this section:
- Form name: Modify the human-readable display name used to identify the form within your dashboard.
- Slug: Update the URL-safe endpoint path (e.g.,
/contact-us). Changing this updates the destination address for API submission queries.
Submission Actions & Redirection
You can configure what happens after a successful submission:
- Submit Button Label: Customize the text on the submit button (e.g.
Send Message,Join Waitlist). - Success Message: A text message shown directly on the page to visitors after a successful submission (e.g., Thank you! We'll be in touch.).
- Redirect URL: Instead of a success message, redirect users to a custom URL (e.g. a personalized
/thank-youpage or an external site).
Spam Protection & Filters
We provide robust, built-in security features to protect your forms from spam and bots:
| Feature | How It Works |
|---|---|
| Honeypot Trap | Inserts a hidden form field that is invisible to human users but filled out by automated spam bots. If a bot fills it out, the submission is silently rejected (the bot receives a fake success message, but no data enters your inbox). |
| Google reCAPTCHA v2 | Adds standard Google reCAPTCHA checkbox verification to the form. Note: Enter your reCAPTCHA site key and secret key directly in this form's Protection settings — each form has its own independent keys. |
| Limit One Per Email | Prevents multiple entries from the same email address. Checks the form's past submissions for matching email field values and blocks duplicates. |
Integrations & Notifications
Beyond spam protection, a form's submissions can be forwarded to your team's inbox and to other apps installed on the site.
The HubSpot and Zendesk integrations below only become available once the matching app is installed and connected on this site via the Apps tab (see Apps). Until then, their toggles are shown greyed out and disabled.
Sync Submissions to Installed Apps
The Sync submissions to installed apps (e.g. Mailchimp) toggle is enabled by default and forwards every new submission to any installed app that supports data sync, such as Mailchimp Audience Sync. If no sync-capable app is installed on the site, the toggle is disabled with the note "Install an app like Mailchimp Audience Sync on this site to enable this."
Submit to a HubSpot Form
The Submit to a HubSpot form toggle is off by default and only enabled once the HubSpot Forms app is installed on the site (otherwise it shows "Install HubSpot Forms on this site to enable this."). When turned on, two additional fields appear:
| Field | Description |
|---|---|
| HubSpot form GUID | The target form's GUID from your HubSpot account. |
| Field mapping | Pairs of HubSpot field → Site Builder field, added one row at a time via + Add field mapping. For each row, type the HubSpot field name and choose which of your form's fields should supply its value. |
Create a Zendesk Ticket on Submission
The Create a Zendesk ticket on submission toggle is off by default and only enabled once Zendesk is installed and connected on the site (otherwise it shows "Install and connect Zendesk on this site to enable this."). When turned on, three optional fields appear:
| Field | Description |
|---|---|
| Requester email field | Which of your form's fields supplies the Zendesk ticket requester's email address. |
| Requester name field | Which of your form's fields supplies the Zendesk ticket requester's name. |
| Ticket subject | A custom subject line for the created ticket. Defaults to New form submission — {Form Name} if left blank. |
Email Notifications
The Enable notifications toggle (off by default) sends an email to your team every time a new submission is received. Once enabled, add one or more Recipient addresses using the tag input — type an address and press Enter or , to add it to the list.
You can combine all of these — sync to Mailchimp, submit to HubSpot, create a Zendesk ticket, and email your team — on the same form at the same time.
Form Status
Use the Accept new submissions toggle to open or close the form. When disabled (Inactive), the form will reject all incoming payloads and will not accept submissions.
Embedding a Form on a Page
Once your form is configured, you can embed it on any page of your site:
Go to the Overview tab of your site and click Open Editor next to the page you want to edit.
In the left sections library, locate the Forms category (or add a Form Block from your blocks list).
Select the Form Block on the canvas.
In the Right Sidebar property panel, locate the form selector dropdown and pick the form you want to display.
Publish your site to make the form live for visitors.
Related
- Apps — Install the Mailchimp, HubSpot, or Zendesk apps that forms can sync to.
- API Blocks — The other way to bring dynamic, live data onto your pages.
- Site Overview & Page Manager — See the Forms tab in context with the rest of the sidebar.